Move Cuts Between Mats In Cricut Design Space

How To Rearrange Mats In Cricut Design Space Cricut Design Cricut Cricut Mat

Keep Your Design In The Same Spot In Cricut Design Space Cricut Cricut Cuttlebug Cricut Design

How To Combine Mats On Cricut Design Space Cricut Design Cricut Cricut Tutorials

Pin On Cricut
Combining Mats In Cricut Design Space How To Move Designs On Mats How To Combine Two Mats Youtube

How To Lock Image Positions In Cricut Design Space How To Heat Press Cricut Business Tutorial Cricut Tutorials

Once selected simply drag and drop the design wherever on the mat you would like the cricut to cut.
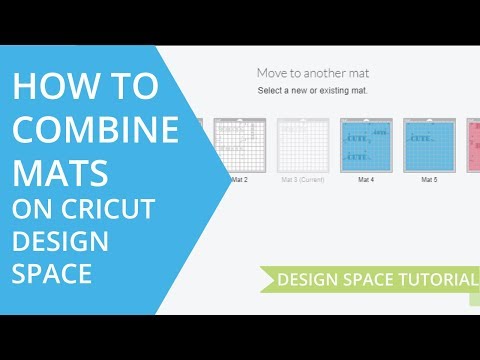
Move cuts between mats in cricut design space. If items are not attached cricut design space will cut in paper saver mode meaning it will automatically place objects on the cutting mat as close together as possible to conserve material. Click go and then follow the on screen prompts to cut your project. Tap the more options icon 3 dots in the top left of the selection box. Select move to another mat.
Click on the circle and choose the option to move to another mat. If you re moving items to a new mat you can choose a color. Select the elements on the mat that you want to move from the project preview. Choose create new mat or select an existing mat to move the selected elements.
Create a background shape the size of the print then cut dimensions one of the easiest ways to organize your images to save paper when using the print then cut feature is to create a background shape. However design space included these on 2 mats and i thought i could use my paper better to fit it all on one mat. This feature is found in the mat preview and is accessed by tapping the more options icon in the top left of the image selection box. Both hide image and move image between mats are available on the web and ios versions of design space.
From here you can move to an existing mat or create a brand new mat of any color. The move and hide on mats feature in cricut design space allows you to conserve material by manually consolidating your project elements onto fewer mats or hiding the ones you don t need. Select your design drag and drop to move select the design you want to move. Designing for placement on the mat.
Then select move to another mat design space will then allow you to choose which mat you d like to place that specific image on notice how the one star has moved from the turquoise mat to the pink mat.

How To Hide And Move Images In Design Space Design Cricut Design Image Design

Easily Upload Svg S Into Cricut Design Space Cricut Design Cricut Tutorials Cricut Projects Vinyl

Pin On Cricut

How To Rearrange Mats In Cricut Design Space Rearrange Cricut Design Cricut

Centering On Paper With Cricut Design Space Youtube Cricut Design Cricut Tutorials Cricut

Get That Bug Out Of The Box Cricut Guide Sheets Cricut How To Use Cricut Cricut Projects Beginner

Pin On Cricut Ideas From Bloggers And More

Pin On Cricut Tutorials

Pin On Vinyl Tips

Cracking The Cricut Reference Guide For Cricut Design Space In 2020 Cricut Projects Beginner Cricut Cricut Tutorials

How To Upload Your Own Images Into Cricut Design Space Cricut Tutorials Cricut Cricut Design Studio

Pin On Blogging As Creators Crafters Designers

Cricut Guide With Images Cricut Projects Cricut Cricut Tutorials

Pin On Crafts

Uploading Free Fonts To Cricut Design Space In 2020 Cricut Projects Vinyl Cricut Tutorials Cricut

How To Crop An Image In Cricut Design Space Cricut Design Cricut Cricut Design Studio

Pin On Fonts Are Fun
Cricut Cheat Sheets Lorrie S Story Cricut Cricut Expression Cricut Tutorials
3

10 Cricut Explore Air Tips Tricks Cricut Tutorials Cricut Explore Cricut Explore Air Projects

Cricut Coach Playbook Quick And Easy One Page Diagrams For Popular Tasks In Cricut Design Space Cricut Cricut Design Cricut Tutorials

Machine Settings Expressions Vinyl Cricut Heat Transfer Vinyl Cricut

Cheat Sheet Cricut Design Space Nelidesign In 2020 Cricut Design Cricut Cricut Tutorials

Move And Hide On Project Preview Help Center Cricut Design Cricut Help Projects

Vinyl For Crafts A Beginner S Guidebook Vinyl Crafts Crafts For Teens To Make Cricut Projects Vinyl

The Best Materials For Cricut Explore And Cricut Maker Machines Cricut Cricut Explore Expressions Vinyl

Make Any Font A Writing Font For Cricut Design Space Cricut Fonts Cricut Writing Fonts

Pin On Svg And Font Tutorials

25 Tips Tricks For Cricut Explore Air 2 Cricut Maker Beginners Cricut Tutorials Cricut Cricut Explore

Pin On Scrapbooking

Pin On Cricut Cutting

Account Suspended Cricut Cricut Tutorials Cricut Cuttlebug

Quick Tip Cards For Cricut Cricut Cricut Tutorials Cricut Design

How To Upload Svg Files To Cricut Design Space Video Pics In 2020 Heat Transfer Vinyl Projects Cricut Projects Vinyl Cricut Design

Pin On Cricut

How To Move Svg Files From Dropbox To Cricut Design Space Imaengine Youtube Download Fonts Font App Cricut Apps

Mat Cheat Sheet Cricut Mat Cricut Projects Vinyl Cricut Explore Projects

Pin On Cricut Die Cutting Embossing Vinyl More Craft Machines

Magic Mesh As Transfer Film For Paper Projects Scrapbooking Cricut Paper Projects Card Making Tips

The Cricut Design Space Desktop App Working Offline Cricut Cricut Tutorials Cricut Design

Pin On Cricut Design Space Best Tutorials On The Web

Cricut Tips Tricks What Not To Do For Success Jennifer Maker Cricut Tutorials Cricut Supplies Cricut Craft Room

